
Seatmap Management
Use Billy's Seatmap Management to configure how seats are assigned, priced, and selected for your event. From defining ticket categories on the map to controlling how buyers choose their seats at checkout, Billy gives you full control over the seated experience.
Use Billy's Seatmap Management to configure how seats are assigned, priced, and selected for your event. From defining ticket categories on the map to controlling how buyers choose their seats at checkout, Billy gives you full control over the seated experience.
This is useful when you want to:
- Sell tickets for venues with assigned seating
- Let buyers choose their exact seat on an interactive map
- Define different pricing tiers across seating zones
- Block specific seats from public sale (press, accessibility, holds)
- Offer both automatic and manual seat selection to buyers
1. Setting Your Seating Mode
When creating or editing a sales channel, the first step is to define how seats are assigned for that channel.
- Open your event and go to Sales channels
- Select an existing channel or create a new one
- In the Edit channel panel in the top right corner , scroll to Seating mode
- Choose one of three modes:
Assigned seating
Buyers do not choose their seats, they are automatically allocated at checkout.
Seat selection
Buyers can browse the interactive seating map and choose their exact seat during checkout.
Mixed seating Combines both modes. When a buyer reaches checkout on a mixed seating channel, they are presented with two options before paying : automatic assignment and manual selection.
Pro tip: You can set different seating modes per sales channel. For example, your VIP presale channel could use assigned seating while the general public channel allows seat selection.
2. Seating Configuration — Assigning Categories & Blocking Seats
Once your seating mode is set, configure the map itself from the Seating Configuration section of your event.
Accessing the Seating Map
- Open your event and go to Seating Configuration
- The interactive seating map opens with your venue layout
- You'll see two configuration modes at the top:
- Categories & Pricing – Assign ticket types to seats
- Block/Release Seats – Control seat availability
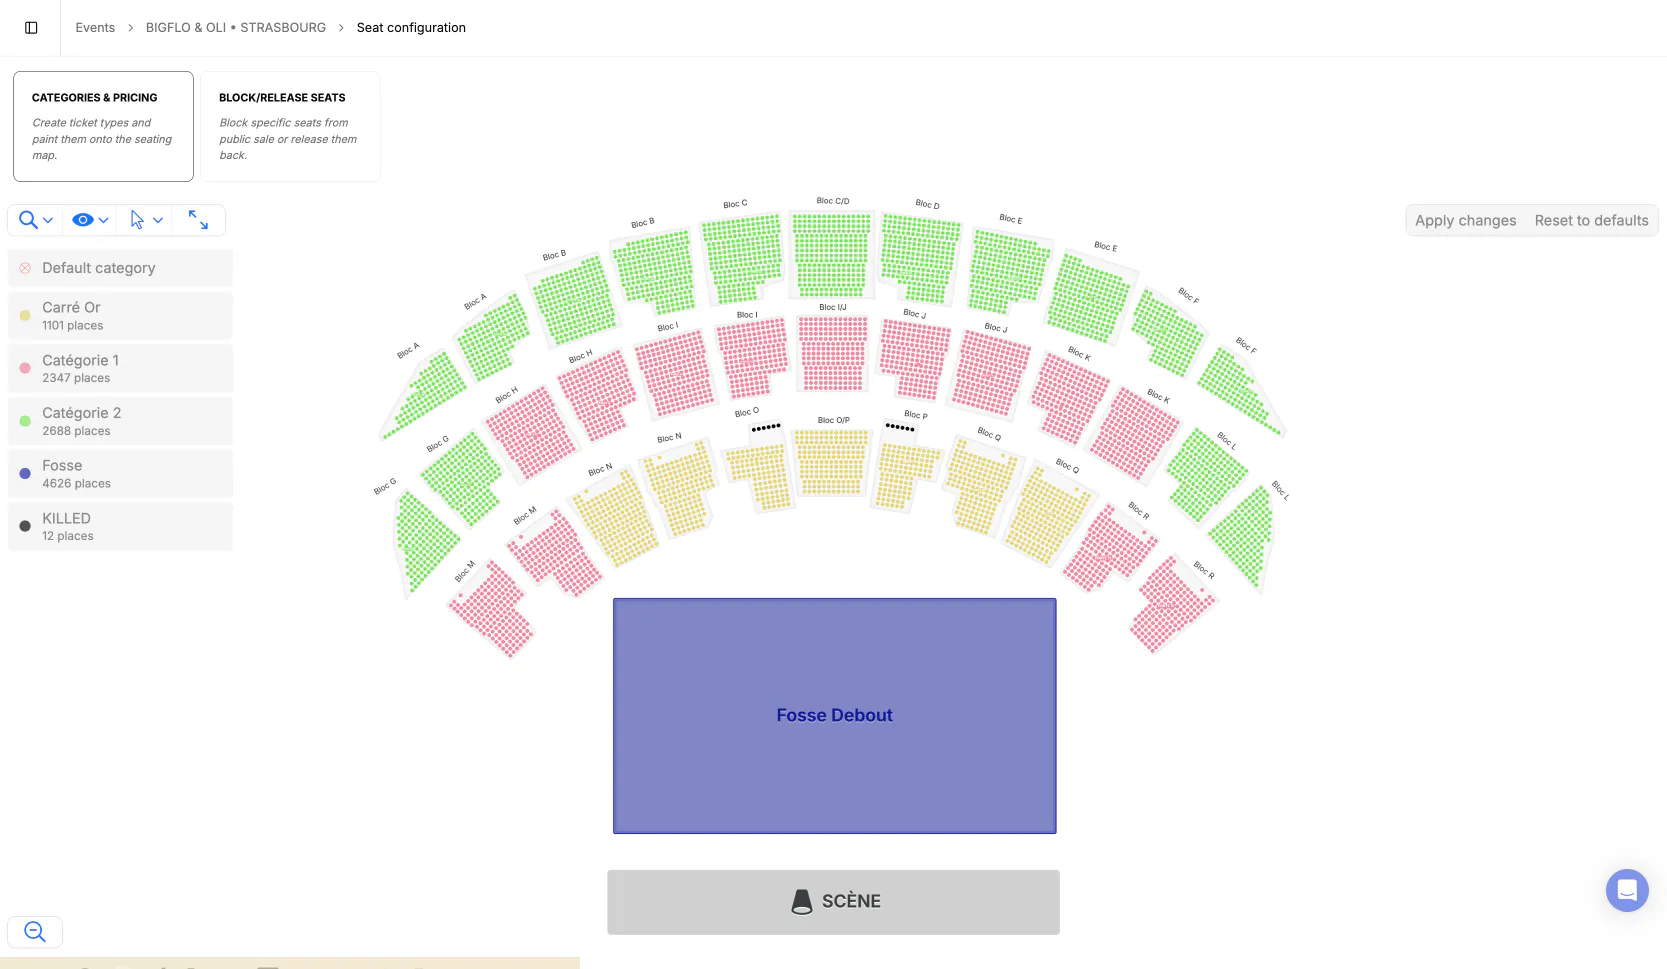

Categories & Pricing
Use this mode to paint ticket categories onto the seating map and define pricing per zone.
- Select Categories & Pricing at the top of the map
- Your ticket categories appear in the left panel (e.g., Cat 1, Cat 2, Carré Or/VIP, Fosse)
- Select a specific section or seat
- Assign the category you want to configure by clicking on it
- The selected seats are assigned to that category and displayed in its corresponding color
- Repeat for each category until the full map is covered
- Click Apply changes to save
Key details
- Colors make it easy to visually verify zone coverage at a glance
- Categories must be created in Tickets & products before they can be painted onto the map
Block / Release Seats
Use this mode to remove specific seats from public sale or restore previously blocked seats.
- Select Block/Release Seats at the top of the map
- Click or drag to select the seats you want to block
- Selected seats display an ✕ icon to confirm they are blocked
- Click Apply changes to confirm — the button shows a count of changes pending
- To release blocked seats, select them again and apply changes
When to block seats:
- Press and media holds
- Accessibility or PMR reserves
- Sponsor or VIP holds not yet released
- Seats with obstructed views (Visibilité Réduite)
- Technical or production holds
Pro tip: Use the selection tools (rectangle, lasso) in the toolbar to quickly select entire rows or sections rather than clicking seat by seat.
Important rule — no isolated seats: Billy prevents buyers from leaving a single seat isolated between two sold or selected seats. If a buyer's selection would create an isolated seat, the system blocks the action and prompts them to adjust their selection. This ensures no single seats are left unsellable on the map.
3. Best Practices
Configure your map before opening sales Complete category painting and seat blocking before your sales channel goes live. Changes to the map while sales are active can create inconsistencies.
Use blocking strategically Block holds early and release them in batches as your event approaches. This creates urgency and allows you to manage inventory across different channels.
Match seating mode to your audience For premium events or loyal fan bases, seat selection enhances the purchase experience. For high-volume general sales, automatic assignment speeds up checkout and reduces cart abandonment.
Review category coverage before launch Zoom into every section of the map to verify all seats have been assigned to a category. Unassigned seats (shown as default category) won't be available for sale.
Test the buyer flow Before opening sales, preview your widget in seat selection mode to experience the checkout flow as a buyer would.
In Summary
Billy's Seatmap Management gives you three levels of control: seating mode, map configuration, and buyer experience. With Billy, you manage every aspect of the seated experience from a single interface, from initial map setup to the moment a buyer picks their seat.